Son of a ^&%*!, Maybe you got a little too cocky, maybe you were flying just a little too crazy in Sport mode, or maybe you are just trying to figure out how to control your Mavic Mini but you had a little crash and the propellers don’t look good.
Changing the Mavic Mini propellers might seem straight forward but there a couple of critical steps that you could easily miss. Before I get into the guide that will lead you step-by-step to replacing your props let’s talk about some prevention methods that will stop you from hopefully ever having to use this guide again. If you’re not all about the Benjamin Franklin cliche “An ounce of prevention is worth a pound of cure”, then suit yourself and scroll down to Replacing Propellers [Illustrated Guide].
Preventing Damage to the Propellers
The propellers on the Mavic Mini seem a little strange. They flop about all loose and don’t look like your standard propeller. This drone was designed with a lot of safety features and this is one of them. You can actually stick your finger out into the spinning prop area and let it hit your finger without hurting yourself. NOTE: I don’t recommend trying this just to see what it feels like but I can firsthand say it is not that bad. And it would definitely hurt a lot more if the props were rigid.
Since the propellers are all floppy and slightly flexible they can be bent and easily damaged. One of the common ways to mess the propellers up is not actually crashing while flying but simply by transporting the drone. The Mavic Mini is amazing in the fact that you can throw it in your pocket and head out to fly. But, if you have something else in your pocket you forgot about or something in your backpack that the drone catches on, you could be in trouble. There is a fairly inexpensive solution to this problem. By using a prop holder that secures the blades from spinning about all loose. Buy it here on Amazon…
Now the most common way to mess up your propellers is through a crash. You bumped her into sport mode, got a little adrenaline rush, and then just got a little out of control as you slammed into a fence/tree/playground/house. Or maybe you were just flying cinematically through the inside of your house and knicked a door frame. Either way, it doesn’t take much to mess up these propellers. Luckily, there is another fairly inexpensive way to help with this. Use a 360 deg protective cage for the props. I would definitely suggest this if you are planning on doing a lot of flying indoors as it will also help protect your walls. Grab one here…
Mavic Mini Protective 360 Protective Cage Closed Propeller Protection Cover
Finally, before we get into the guide, whether you are an expert pilot or beginner, it is a good idea to have some extra props in the toolbox. DJI realized this and even the basic package came with extra props. Now if you broke some and you’re here to learn how to replace them, I would follow the steps in the guide below to replace them and then buy some more replacements so you are ready. Once again…fairly inexpensive. See the link below.
2 Pairs Mavic Mini Propellers, Original Accessory Part for DJI Mavic Mini
Replacing Propellers [Illustrated Guide]
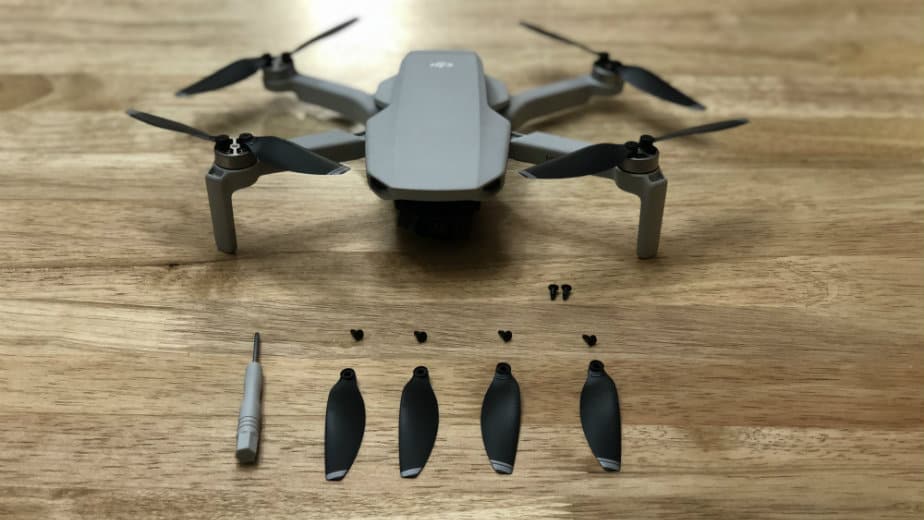
Step 1 – Tools
You will require the following to replace the propellers on the Mavic Mini
- Small Phillips Head Screw Driver (Comes with Mavic Mini)
- Replacement Props Kit
- 2 CCW blades
- 2 CW blades
- 6 Screws
- Two Hands
- Clean, well-lit Workspace
- Mavic Mini
Step 2 – Analyze Which Prop Is Broken
There are clockwise (CW) and counterclockwise (CCW) props. The majority of drones are set up like the following.
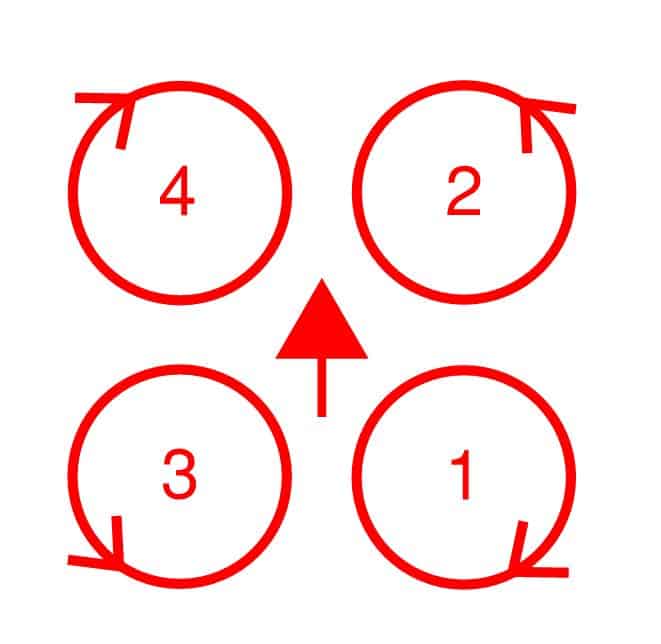
The Mavic Mini has a few signs to help you out. You’ll notice at the ends of the arms right before the motor there is a line on the bottom left and top right arms (3 and 2 in the diagram above). This indicates the props that are to spin CCW.
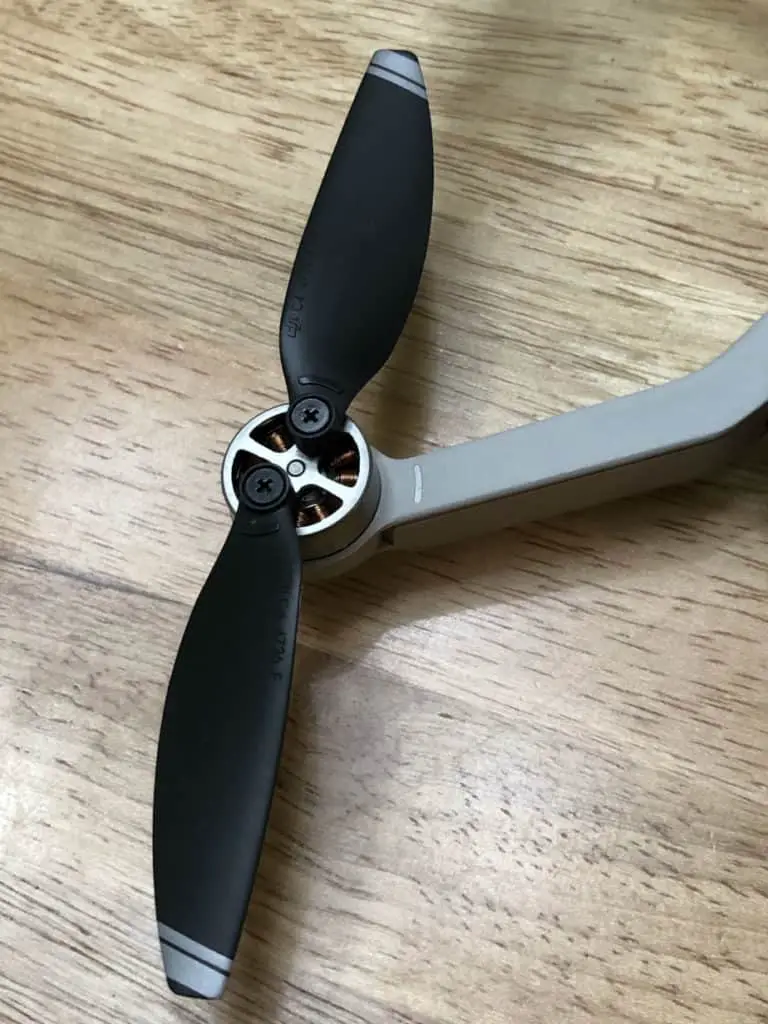
But, one of the easiest ways to tell is from the lines on the tip of the prop. If there are two gray lines it is a CCW prop. If there is a single gray line across the top it is a CW prop.
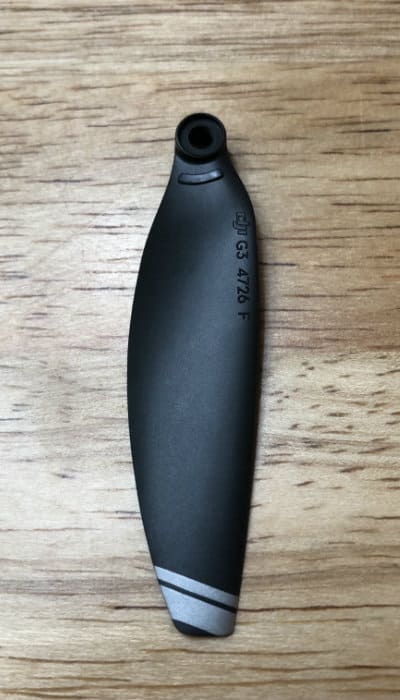
CCW Prop 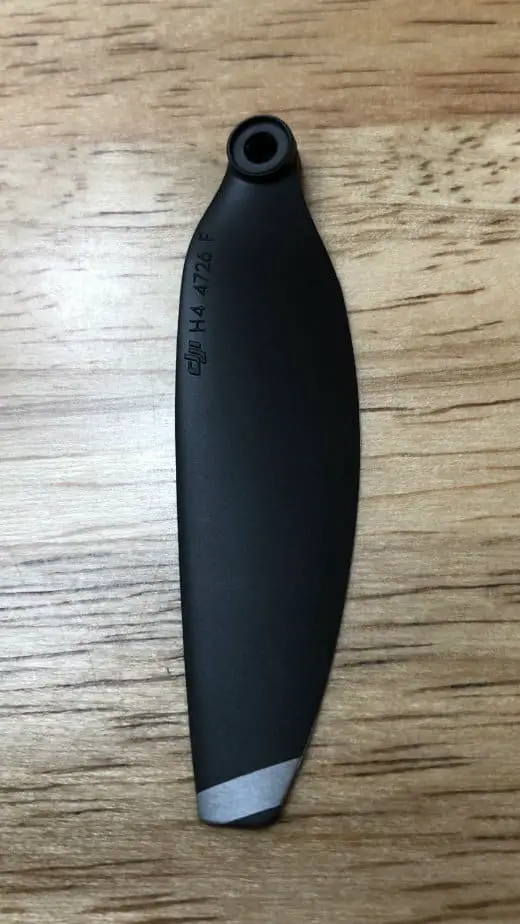
CW Prop
To be honest, you can just ensure that if you are removing a double striped prop you replace it with a double striped prop but it good to know the theory behind it.
Step 3 – Remove Damaged Props & Screws
If it only seems like one of the blades attached to the motor is damaged and you’re thinking to yourself “Great I only need to change out the one” … think again. The factory balances these blades/props in pairs. So you are going to need to change out both of the blades.
The screws come with blue Loctite on them. This Loctite helps seal the screw in the threads and prevents vibrations. However, once this seal is broken it doesn’t bond again very well. That is why DJI throws in screws with their replacement prop kit. It actually has 2 extra screws in case you lose them.
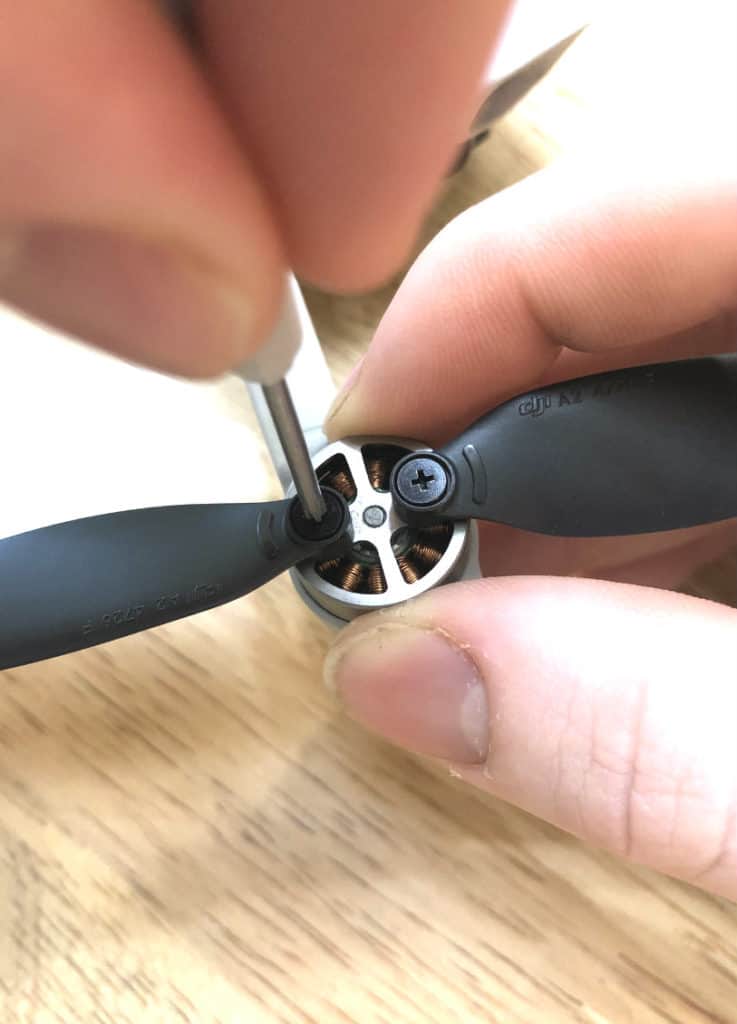
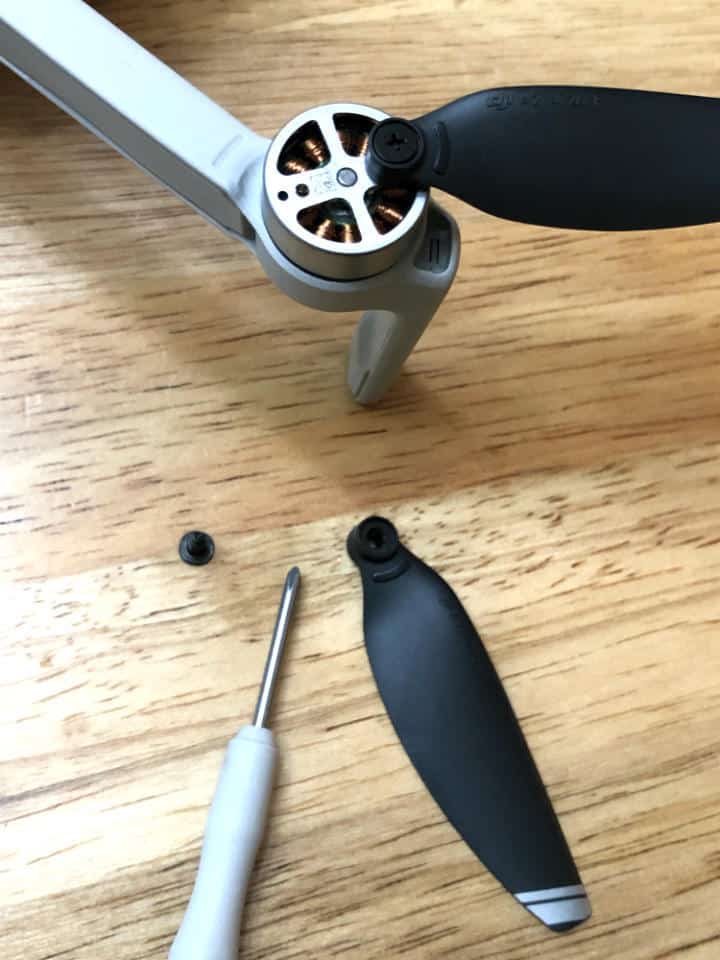
Remove the prop by holding the outside of the motor and taking the screw out. Pretty straightforward. Nothing too tricky about this (Left-Loosey 😉 ). Remove both props/blades and toss them and their screws in the trash. Remember they are cheap. Do be careful to not jab the screwdriver into the copper windings inside the motor. If you drop a screw in there and can’t fish it out with your fingers, turn the drone upside down to remove the screw.
Step 4 – Install New Propellers
The best way to install the new blades/prop is to drop one of the new screws through the hole in the prop and hold the prop over the threaded hole on the motor. Then use the other hand, with the mini-screwdriver provided by DJI, to drive the screw into the hole. Righty-tighty.
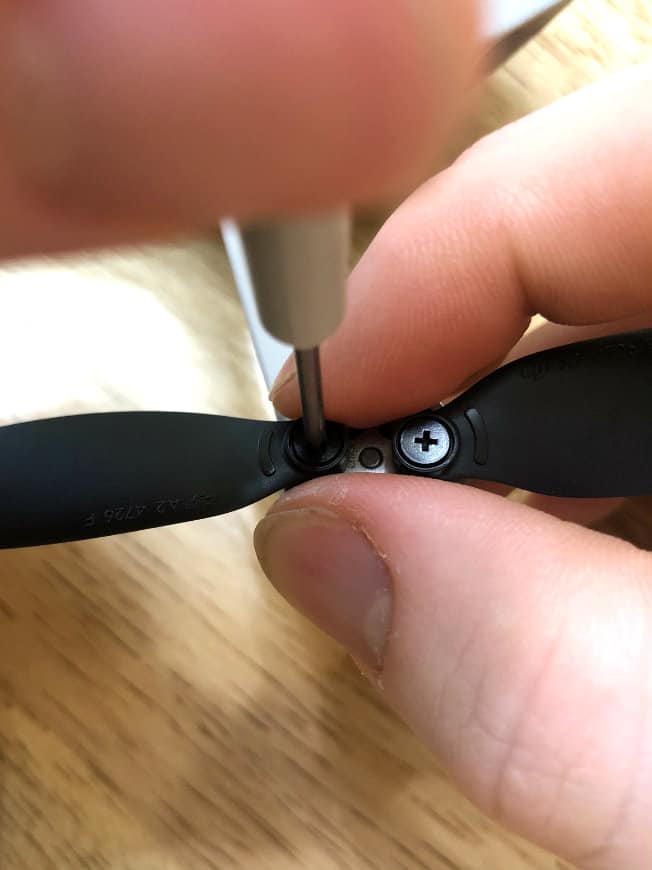
Note: Tighten snug but do not overtighten. If the prop cannot swing back and forth freely you either cross threaded the screw or went way too far overtightening. The threads on the screw do not go too deep to prevent this from happening
Final Tips & Useful Links
Now that you completed your repair successfully you can get back out and enjoy. However, just as you had that extra pack of props in your Mavic Mini box, it is a good idea to order another set of replacement props. LuckyBird is the Amazon Authorized dealer for DJI products. Grab the exact same pack of extra props that your drone came with here…
However, if you would like to pimp your drone out a bit you can get a multi-color pack from other vendors. Here is a pack of 32 Props with black, blue, yellow and red props for the same price as the DJI Props from Helistar…
Another Cool prop option if you want to go even more aftermarket is to get Carbon Fiber Props. These claim to be quieter and give you a longer flight time. The cons include that the drone is a little more unstable as the props are not perfect have a different effect on the air to the standard props. Also, these are much more likely to hurt you/chop you if you accidentally touch while spinning. But….they look badass…
Like I mentioned in the prevention section at the beginning if you’re planning on flying indoors get a 360 degree Prop Protection cover. Here’s DJI’s model…
PGYTECH has a prop protection cover that is a little beefier and has better reviews on Amazon. See it here…not. They have discontinued it. Here is an equivalent one made by XiangMeng
XIANGMENG Prop Protection Cover
Or Get a Prop Cover that doubles as extra-long landing gear. I’ve always thought the way the Mini lands seems to be awkward with its little stubby legs. Check em out…
Landing Gear & Prop Protection
A Prop holder for transportation is definitely a good idea to have so you do not bend your props. I linked to one at the beginning of the post to a LuckyBird holder. I personally also really like this silicon one from Skyreat…
Silicon Prop Holder from Skyreat
In my research, I noticed another one that literally is just a velcro strap. But I don’t know if I like how much it seems to be pushing on the props. Check it here…must have been bad cause it was recently removed from amazon. Instead, check out the link below for the most popular prop holder.
Honestly, there ought to be an easy, clever way to make one of these prop holders from home. Then it’d be free and easy to have right away. Maybe I will come up with something and link to it here in the future.
Note: There are starting to be a lot of neat new accessories for the Mavic Mini and It makes me want to write a post on the best accessories for the Mavic Mini. I will get on writing that and link to it here…
Thanks for sticking with me to the end of the post. I hope you had a successful repair and have a great day!
