Intro
I have not gone out and personally purchased every single one of these accessories…at least not yet. I do not have the $$$ for that. However, I have done a lot of research on them and hope to save you some time in picking the best extras to really pimp your Mini out. As I went through this I found a couple of different options for certain accessories and linked to all of them and explained the differences. Each type of accessory I gave practicality and style points. Up to 10 in each category. Also, a cost ranking $ – $$ – $$$. I explain why each accessory is useful and provided links to the products. At the very bottom of this post is a summary and table with all the links.
Now I do want to warn you before you fall in love with some of these great accessories. There is one con that applies to many of these. Weight. This drone was designed to come in 1 gram under the legal limit to avoid having to go through registration. I live in the US but I am a Canadian (currently on work visa…not illegal *Thumbs Up*) so I am aware of the regulations in both countries.
MOTOR COVERS
| Practicality | 9 |
| Style | 8 |
| Cost | $ |
The Mavic Mini runs with brushless outrunner motors. What does that mean? Basically an outrunner motor has the permanent magnets on the outside and the coils are fixed on the inside. You’ll notice when flying that the entire outside case of your motor along with your props spins. However, you might also notice that you can see all the copper coils from above. Most outrunner motors sold for FPV drones have the top covered.
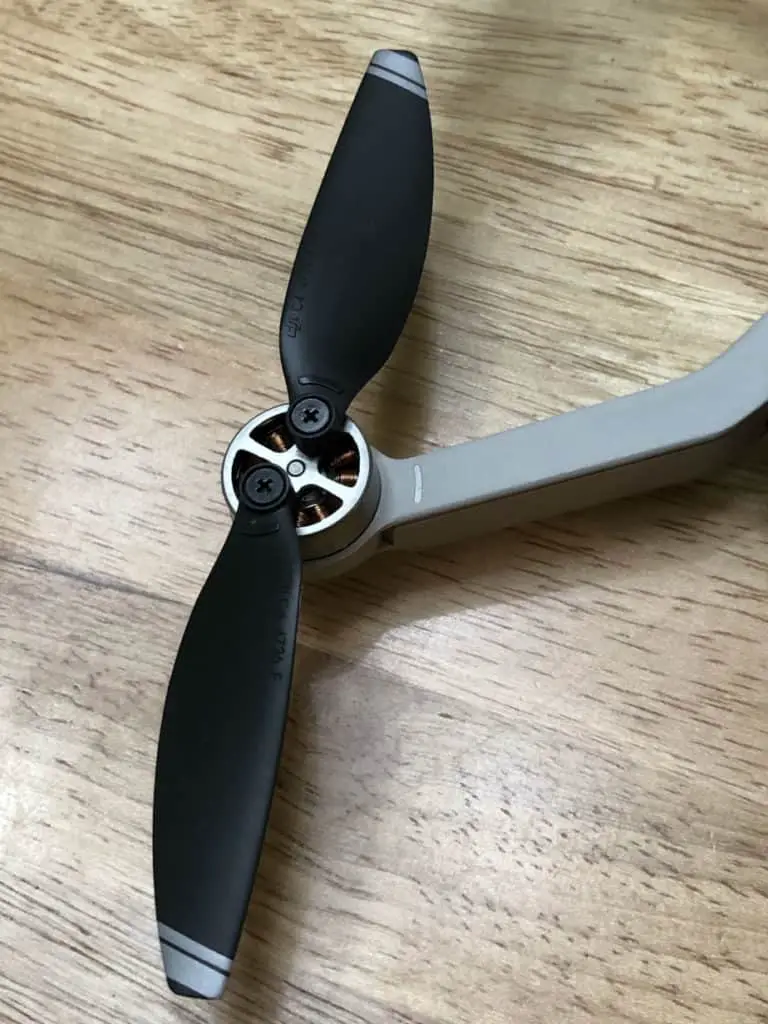
The Mavic Mini Motors are a little bit naked and vulnerable. But have no fear because a few companies have gone the extra mile and come up with some options to clothe them and protect them. If you flew into a bush/tree you could chop up the branches and there’s a chance debris could drop into the motor. Beaches have sand and if you’re on the ocean it is salty which makes it worse. Sometimes it starts to rain while you’re flying or hey if you’re in Canada it be snowing sometimes! Motor covers can help out a lot in all these situations to prevent damage.
I bet some people are thinking…”But dude putting these caps on is going to block off airflow and probably overheat the motor *nerdface*”. I was thinking the same thing to be honest. But, the Mavic Mini is very light and the motors are strong. What really put my mind to rest was this youtube video by Air Photography. He gets a set of motor covers and runs a temperature test which shows no difference in temperature, vibration, or flying stability. Click here to check it out.
Before I get into the different motor covers there is one thing to mention. DJI uses Blue Loctite on all their motor screws. This is because it is a metal screw fastening to a metal frame and it can help lock it. It may also help just the tiniest bit with vibration. You’ll notice your extra prop set has Blue Loctite on the Screws. I mention this because when installing all of these motor covers you must remove your props. This means if you want to do the job properly you need to wipe off those screws and reapply a small amount of Blue Loctite to them when you reinstall them. It is super cheap so I would just do it properly if I were you. Grab Blue Loctite from Amazon for $4 here. And for my Illustrated guide on replacing your props click here. Just add the intermediate step of installing the Motor Cover. Enough nonsense let’s get into the different products now.
The Darkhorse Motor covers are probably the beefiest. They come with screws and the cover actually completely covers the motor. The blades are then attached to this cover. They are aluminum and come in either red or black. Throwing these bad boys on here reminds me of slinging some sick rims on your ride. Of all the motor covers these may be the heaviest but they are still advertised at just under 1g each. They do offer some of the best coverage and advertise as dustproof, waterproof and scratchproof.
Price: ~ $10
Pros: Great coverage and beefy.
Cons: Bulky. Slightly heavier. Extra Screws.
Link: Dark Horse Motor Covers
The Helistar motor covers are one of the most simple covers, which is often times the best way to go. They are the least expensive and have a straightforward design. They simply have a hole cut out where the prop attaches to the motors. They slip over the motor and the props attach the same way they normally do. Splashproof, dustproof, scratchproof these covers still do a great job protecting the motor. These are the covers shown in the youtube video above in the temperature and flying test. Check it here too. Come in aluminum red or black.
Price: ~ $8.50
Pros: Simple design, lightest of all
Cons: May not seal off the motor the best
Link: Helistar Motor Covers
RC Gear Pro has got a neat little kit. It basically has identical motor covers to the Helistar brand above. However, it comes with a decal kit and a lens cover for your camera as well. Choose from black motor covers and a black carbon fiber-like decal kit or red motor covers and red carbon fiber pattern decal kit. So if you like the idea of knocking a couple of accessories out in one kit this could be for you.
Price: ~ $16
Pros: Simple design, comes with decal kit and lens cover, Carbon fiber decals add strength to drone (nah jk)
Cons: May not seal off the motor the best
Link: RC Gear Pro Motor Cover Kit
Finally Vkarh has a set of motor covers that I just added here for the different type of style. They seem almost identical to the beefy Darkhorse however they come in a silver aluminum alloy that is quite sexy. If you’ve got some nice chrome rims on your car you might consider a matching Mavic Mini…
Price: ~ $9.50
Pros: Chrome look, Great coverage and beefy
Cons: Extra screws, slightly bulkier
Link: Vkarh Motor Covers
PROP HOLDERS
| Practicality | 9 |
| Style | 5 |
| Cost | $ |
Prop holders are a useful accessory. They are simple and practical. What are prop holders for? Well, when one throws the Mini in their pocket or bag or backpack the propellers kinda just flop around. They are not the most rigid material either. The thought behind prop covers is to secure the props so that they do not flop around and catch while in transportation. A bent prop can cause the drone to work harder to stabilize and even crash if it’s really bad. They are installed while the drone is in its folded position.
To be honest I wouldn’t be surprised if someone has come up with some genius ways to do this just with household items. In fact, there’s a thread here for the Mavic 2 where someone has made some from a 2″ Velcro strap. Also, if you have a 3D printer you could probably make them.
If you don’t want to risk it with your own homemade product check out some of these. There’s a lot of controversial comments/reviews on whether the strapping is holding the props too tight or putting too much pressure on the motor.
There’s another great review video of the three different styles of prop holders here. He shows you how some prop holders don’t fit in the DJI travel bag and it’s nice to see what they look like in the video over the product photos.
The Skyreat Prop holders are basically a silicon strap that goes around the outside of the motors and holds the props underneath it facing towards each other. There are a variety of reviews on this product. The unhappy 1-star reviews mention that it is an extremely tight fit in the DJI fly more bag that the drone comes with.
With them being silicon as well (Grabby sticky ish material) one customer got there Mini stuck in the bag! However, if you’re tossing these in your backpack I would say they are a good option. I’ll throw a second link in here for an identical pair from iMusk that are the same ones linked in the comparison video above. The iMusk prop cover description was honest in their description and straight up told customers it will not fit in the DJI bag.
Price: ~ $9
Pros: Secure props well, Easy Prop lineup/install
Cons: Don’t fit in DJI Bag, Not the best protection for motors
Link: Skyreat Prop Holders
Link2: iMusk Prop Holders
The original DJI Prop holder accessory is definitely the bulkiest of all these prop holders. However, it protects the drone quite well. Since the bottom plate on it covers the front of the motors as well and then has a large strap that goes around to catch the props on the top before it buttons in. In comes with either a beige almost light pink strap or the same charcoal grey that the Mavic Mini is. It also comes with a wrist strap that fits through the holder. This prop holder could be useful if you were planning on carrying your drone on a hike and would also do well to protect it inside a backpack. It is more expensive though but what do else do you expect from a DJI Product…
Price: ~ $17
Pros: Good protection, Looks Sleek
Cons: Bulky, more expensive, Does not fit in DJI Bag
Link: DJI Prop Holder
Finally, the Sunny Life Prop holders (sold by a few vendors on amazon) are a bit of a mix between the original DJI ones and the lightweight silicon strap style. It goes around the middle of the drone and snaps back onto itself. The props need to be adjusted to fit in underneath the strap. The fidgeting to line up the props can be more extensive with these, however, it is the only one that manages to squeeze into the DJI Bag. They come in black or red.
Price: $6
Pros: Cheap, Fit into DJI Bag
Cons: Not as protective, fidgety to line up props
Link: Sunny Life Prop Holder
LEGS
| Practicality | 7 |
| Style | 6 |
| Cost | $ |
The Mavic Mini was designed to be as light as possible. Well, they at least had to hit under 250g. They shaved some of this weight off by having a very minimal design for the legs. The drone almost lies on its belly. This can sometimes be annoying. Taking off from the concrete or the floor in your house is a piece of cake. But, take your Mini into the forest and you oftentimes don’t have anywhere to take-off!
If you have a friend you can hand it to them and watch as they lean back in terror while you take-off from their outstretched hand. This can be amusing and fun but if you’re by yourself it’s a pain in the ass. You gotta find a log or something to take-off from and try to get it as level as you can. Another big thing is that without legs your camera/gimble is very close to the ground and it can get dirt/sand in it which is not ideal. However, Leg accessories are here to help elevate your Mini to new heights!
One of the most popular and first leg extensions to hit the market was from PGYTECH. They have a minimal design that clips on (easy install) and has the ability to fold back onto the drone as well. Despite being minimal they do add weight and do not fit into the DJI Case. However, they add about an inch clearance and they only weigh about 17 grams. If you want to see a good review video of them, check it here.
Price: $15
Pros: Easy Install, Minimal Design, light-weight for legs
Cons: Don’t fit in DJI case
Link: PGYTech Leg Extensions
This next pair of Leg extensions from RC GEEK are simply 3D Printed legs. Just goes to show if you have your own 3D Printer you can make a lot of accessories yourself. I hope to get one soon….Anyways back to the guide. These legs lift the drone up about 2 inches! Twice as much as the PGYTech…however, at the expense of some weight. These legs come in at 45g. That’s about 3x more than PGYTech. However, if you need to land on some bumpy surfaces these bad boys got you covered. Note the amazon reviews for this product are mostly for the Mavic Air, not the mini… just an FYI.
Price: $12
Pros: Great Clearance, minimal design
Cons: Heavier, Bulkier, 3D printed Material
Link: RC GEEK 3D Printed High clearance Leg Extensions
This next one combos into our next category. It is a 2-1 accessory package. Sunny Life makes a leg extension and prop guard/protector combo. The leg extensions lift the quad about 1.2 inches and the prop guards have an effective yet minimal design. Both the guards and the legs come in at 49 grams. That is not bad considering it includes the weight of the legs and the prop protection.
Price: $16
Pros: 2-1 combo accessory package
Cons: Bulky, Doesn’t fit in DJI Bag
Link: Sunny Life Leg Extension and Prop Guard Combo
PROPELLER CAGE/GUARD/PROTECTION
| Practicality | 8 |
| Style | 5 |
| Cost | $ |
It can be tempting to fly the Mavic Mini into small confined spaces because it is so smooth and small. Flying indoors is definitely a possibility with this drone but, there a few things one should be careful about. Bumping into a wall can not only result in a damaged prop but also a nicely scuffed/sliced up wall. Mom would not be proud/happy about that.
The way that the propellers are attached is partly a safety feature. allowing them to rotate freely which means that when they come in contact with your finger or face or anything in their flight path, they rotate back and rather than cutting through it they flex back around it. This does not mean you can fly this into a person and it will not hurt. Left uncovered the props can still draw blood despite the way they are mounted.
Flying up into the trees can be enjoyable and exciting but all it takes is for a small stick to poke a prop and send you down or worse…stuck in the tree. Prop guards/cages/protection help prevent these things from happening. Some of these are a full “cage” around the prop and some are simply a guard to prevent the prop from hitting when moving forwards/backward/sideways. They are practical and can save you money in the long run even if they do cut down your flight time slightly due to the added weight.
PGYTech makes the beefiest prop protection in the cage style. This one has the best protection. It compltely surrounds the props with a simply closed strucutre design. It can still open up with a quick release buckle. Surrounding the props entirely can be useful if you are doing some tight flying indoors or in a sticky situation up in the trees (😂). Despite enclosing all the props it comes in at only 60 grams.
Price: $30
Pros: Complete protection
Cons: Expensive, Bullkier
Link: PGYTech Prop Protection Cage
This next pair of Prop guards are very cheap. If you are on a budget it could be a good way to go for you. The material doesn’t seem the strongest but what do you expect for a good deal ….it’s $6. Skip one Mcdonalds combo meal and get some Prop protection instead. Not only are these inexpensive but they are light as well, coming in at 26 grams.
They also come with a remote control protector for the sticks on your transmitter which is handy. I don’t think the cheaper quality material is much of a big deal due to its sole purpose is to hit obstacles before the props. I have not seen any reviews on these yet, they do buckle onto each arm and I would hope there wouldn’t be any issues with the buckle being a cheaper plastic.
Price: $6
Pros: Cheap, lightweight
Cons: Low protection, low-grade material
Link: Neige Prop Guards
This pair of Prop guards is a nice option that is midrange between the last two with both protection, weight, and price. They come in at about 51 grams and have the simple clip to arm design. They do have more coverage around each prop. There are a few Amazon sellers selling this guard.
Price: $18
Pros: Midrange option
Cons: Not the best protection
Link: Midrange Prop Protection
Of course, I need to add DJI’s own 360-degree Prop guard. It doesn’t quite add as much protection as PGYTech but it comes close. The PGYtech was almost one piece/cage that opens. The previous two guards were 4 pieces, where each guard straps to each arm. DJI’s guard is two pieces, one for each side. Each side weighs in at 23 grams for a total of 46 grams. Note: The DJI Fly more combo actually comes with these Prop guards. Interestingly enough, these guards are found cheaper off of DJI’s website rather than Amazon. I’ll provide both links below.
Price: $29 Amazon $19 DJI Store
Pros: Official DJI Product, Two-piece, Comes with Fly more Combo
Cons: Longer ship times from DJI, Added weight
Link: Amazon- DJI 360-degree Prop guard
Link: DJI Store- DJI 360-degree Prop guard
CONTROL STICK/ROCKER
| Practicality | 6 |
| Style | 8 |
| Cost | $ |
Having good control over your drone is important. Your thumbs are the connection between you and your machine in the sky. Some people get really sweaty hands and may wish that their thumbs stuck a little better to the sticks. Luckily, there are lots of options to not only find a grippier pair of sticks but also find a pair that pops and makes your transmitter look badass.
The stock transmitter comes with plastic sticks that get the job done but leaves room for improvement. Interesting side fact, I have flown before without the sticks in at all and it went surprisingly well. It was a cooler day but I still felt like I had good control.
Some people just use thumbs and some people use the pinching method and pinch the sticks. The pinchers may want a pair of sticks that show more grip around the outside of the stick where they will be pinching. There’s really not much to compare when shopping for sticks although the styles may differ they still offer the same purpose.
Tercel sells an affordable upgrade to the current sticks. These sticks are aluminum and have a silicone band around the outside. There are great reviews on the product with the only complaint mentioning the silicone band has a tendency to spin around the stick and is possibly slightly loose. It seemed rectified by most with a drop or two of superglue. They do fit right into the slots where the stock sticks would snap-in for transportation.
Price: $7
Pros: Inexpensive, aluminum, good grip
Cons: Silicone band mentioned by some to be slightly loose
Link: Tercel Mavic Mini Controller Sticks
Tomat sells a pretty sweet pair of sticks. They are an aluminum golden orange color that looks really cool but refined at the same time. The knurled tops and grooved edges give great grip, even with sweaty hands. These sticks come with another very cool feature. They are adjustable (25-30mm) by screwing the top in or out so you can find the perfect length that works for you. It’s a clever design where you first screw the top piece out and then screw the bottom out to match it and it extends the length. These sticks still snap into the transmitter slots for transportation. They are AAA – Aluminum, Adjustable and Awesome.
Price: $20
Pros: Adjustable, Aluminum
Cons: Expensive for thumbsticks
Link: Tomat AAA – Golden Thumb Sticks
These sticks are made by RC GEEK and are very similar to the last pair. They are aluminum, adjustable and awesome too. The only real difference is that these sticks have a two-tone Gold and silver color. It is really just a style decision between the two.
Price: $18
Pros: Adjustable, Aluminum
Cons: Expensive for thumbsticks
Link: RC GEEK AAA – Golden-Silver Thumb Sticks
NOTE: Search the above pair on Amazon, as sometimes there are other sellers that have the same ones for less.
EXTRA/SPARE PROPS
| Practicality | 9 |
| Style | 7 |
| Cost | $ |
Propellers are the first thing to break when you crash. The Mavic Mini comes with 2 clockwise and 2 counter-clockwise replacement props. It is important when you are replacing props that you do it properly. For a guide on replacing the props on the Mavic Mini and more info on them, check out my post on them here.
I would almost say that props are a necessity more than an accessory. However, some are more practical and some are more stylish. So check these props out.
The first ones I will link to are the DJI Props. This is the same replacement packet that comes with the Mavic Mini and obviously matches the ones on the drone. Nothing super special about them except we know they have been tested, balanced by DJI, and will work like a charm.
Price: $12
Pros: DJI Props, Match existing props
Cons: Boring, not as stylish as other options
Link: DJI Spare Propellers
Helistar on Amazon sells a big pack of propellers for a great price. It comes with 4 clockwise and 4 counter-clockwise in blue, red, yellow and black. So a total of 16 clockwise and 16 counter-clockwise propellers. That’s a lot of props and should have you covered for quite a few crashes. Not only is it a great bulk/value pack but you have different color options as well. The colored props look really neat when the drone powers up and they are spinning. I don’t doubt these are made with cheaper material and probably are not balanced as precisely as the DJI ones but I also doubt you would be able to tell the difference.
Price: $20
Pros: Colored props, value for a big pack
Cons: Not DJI, Not precisely balanced, cheaper material
Link: Helistar Multi-pack Mini Props
Who doesn’t love carbon fiber? It’s black, it looks mean, it’s just got that advanced/expensive look to it. Also, it is extremely durable and tough. However, these carbon fiber props can be a double-edged sword. They can have some unstable characteristics when flying. See, DJI balances their props so that the drone can fly as stable as possible. If things get just the slightest off balance it can make the drone work harder and not keep it as stable. These props can be quieter and claim to be more efficient. Perhaps I will do a test at some point to see…
Price: $20
Pros: Style, Durable
Cons: Not balanced to DJI Standards
Link: Carbon Fiber Mini Props
DECAL KITS
| Practicality | 2 |
| Style | 9 |
| Cost | $ |
Decal kits can make your Mini look badass. They definitely don’t help or boost the performance of your drone. But, they can help protect from small scratches that you may get on your Mini. Or they can be a good way to cover up some scratches that don’t look good.
Most of these are PVC stickers that can be removed if you don’t like them. Make sure when applying that you clean the drone surface as best you can. Since there is not really a pro or con from one sticker set to another I will simply link a whole bunch with their associated price. Your style is up to you. Damn, some of these Decal kits are cool though.
There isn’t many pros and cons in different decal kits. Some look better to some people and worse to others. It’s a matter of personal preference. Some people want to shell out a few more buck to get a decal kit that suits them more. Rather than go into the pros and cons and details. Use the table below to check out a bunch of options.
Mini Bags
| Practicality | 9 |
| Style | 6 |
| Cost | $$ |
This little drone is so compact you can actually just slip her right in your pocket, if you’ve got big enough pockets. And if you got deep pockets, you might as well just buy a Mini bag. Because once you put the drone in one pocket and the remote in your other pocket, you’ve got no room for your wallet or keys!
Some bags have the shoulder strap option and are meant to be carried. Others are more protective cases that can then be thrown into a larger backpack. Some are waterproof and even explosion-proof! Check’em out.
Remote Controller Cable
| Practicality | 9 |
| Style | 7 |
| Cost | $ |
The Remote Controller cable connects your tablet or phone to the remote controller (duh) and helps receive the video signal coming from the drone. Nothing to special about certain cords over others. This cord is more of a necessity than an accessory. Some have better durability and some have flexible casing etc. However, what is important is the length.
The DJI Remote Controller Cable that comes with the drone is about 3 inches long and works fine for plugging up your phone. But once you put a tablet holder in and use a table, it will not reach. The ideal length for a phone is about 3-4″. The best length for an ipad or tablet is about 8-12″.
The controller side is plugged in with a USB OTG connector (OTG means On-The-Go) the other side is typically a lightning connector for Apple products or a USB-C connector for Android products.
Now rather than get a whole new cable you can get an extension to makeup the extra distance. Or you can just get a whole new cable for about the same price. Check out the extension and cables below.
| Apple 1 ft extension cable (2 pack) | $10.58 |
| Android 8″ Extension Cable (Red) | $8.99 |
| Apple 8″ Remote Controller Cable | $6.99 |
| Android 8″ Remote Controller Cable | $6.99 |
ND Filters
| Practicality | 8 |
| Style | 2 |
| Cost | $$ |
A Neutral-Density Filter, or ND filter, reduces the amount of light that enters a camera’s lens. Under bright sunlight, an ND filter allows photographers more leeway in selecting an aperture and shutter speed by preventing overexposure.
ND filters are an accessory that can help the drone take better photos. But what are these and how do they work? ND stands for Neutral-Density Filter. It is a filter that clips over the camera’s lens. When the sun is really bright an ND filter will reduce the amount of light that comes through the lens.
Different ND filters allow more or less light in. The ND4 filter reduces light by 1/4, the ND8 filter reduces light by 1/8, and the ND16 filter reduces light by 1/16. You get the picture? This allows the user to set a longer shutter speed or different aperture and not over expose the picture or video. Also if you want to learn more about ND Filters, I’m about to write an article on them and will link it right here.
Note: This past April 2020 the Mavic Mini got an update that allows the user to manually change the exposure for videos. Before April you were locked in to what the exposure was set at. This made ND Filters even more valuable. Now that you can change settings it gives you an added degree of control along with the ND Filters.
Check out some of these filter packs below.
iPad/Tablet Holders
| Practicality | 8 |
| Style | 6 |
| Cost | $ |
Phone screens are usually not the biggest screens and it can be hard to discern a lot of detail from a picture on them. However, the phone just fits perfect between the controller handle pieces and nothing bigger would fit. This is where the iPad/Tablet holder accessory comes into play. It slips into the spot where your phone would go and allows an iPad or tablet to be held by it.
I really like my iPad holder (MavMount) and it makes me cuss and whine when I forget to pack it. They’re a few different styles of these and they all basically get the same job done. Check out some of the ones I recommend below.